Creating Product Tours with Hopscotch
June 6, 2013
A primary challenge that software developers face is making sure that people understand how to use their products. Ideally, user interfaces should be intuitive enough for people to understand without external guidance. However, as sites grow and features become numerous, unassisted discovery of these features isn't always possible.
To help address this problem, I teamed up with Hans van de Bruggen, a UX Designer here at LinkedIn, to create a framework for making in-context product tours. We submitted a project proposal to LinkedIn's Incubator program and were given the green light to build and open source a tool called Hopscotch.
Check out Hopscotch on Github!
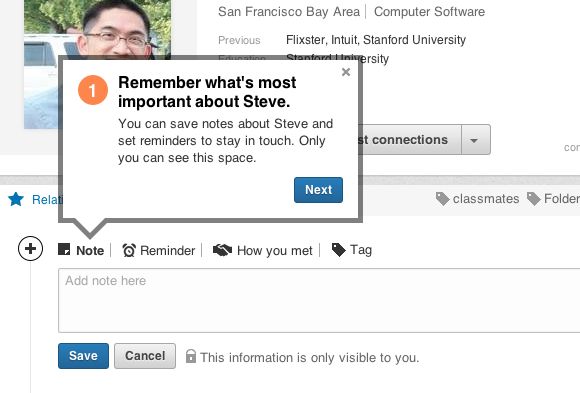
Named after the childhood playground favorite, Hopscotch can be used to introduce a newly released feature or provide a step-by-step explanation on a help topic. A typical tour step would look something like this:
When we started building Hopscotch, we had a very specific set of goals in mind for the framework:
- Hopscotch should be usable on any site. Whether you're building a tour for a site with millions of daily users or for a local community organization website, it should be really easy for anyone to use.
- Developers should be able to start writing their tours as quickly as possible.
- Although richly featured, Hopscotch should have very little impact on page load times.
Hopscotch is just 8kb minified and gzipped. It has no external dependencies: it'll use jQuery if it's available in the page, but it does not require it.
Getting your page ready for Hopscotch is as simple as including two files in your page: hopscotch.js and hopscotch.css. Once you've added those files, you should be ready to start writing your tour. Tours are defined in JSON. A very basic tour will look like this:
Hopscotch takes this JSON and uses the steps array to determine how to render your tour. The target specifies which DOM element to point to. In this example, we use the element id, but you can also use a querySelector string or a reference to the DOM element itself. The placement value specifies where the bubble should appear in relation to the target. The last two options, title and content, define the text to be shown in the bubble. Once the tour is written, all that remains is to start the tour by calling hopscotch.startTour(tour)!
Features
- Event callbacks: Hopscotch comes with event callbacks, so you can specify callbacks for
onStart,onNext,onCloseevents and more. - Multi-page persistence: Hopscotch uses HTML5 sessionStorage if available, for persisting tour state across pages and falls back to cookies by default.
- I18n: All tour controls are fully internationalizable.
- Lightweight callouts: Sometimes, all you need is a single callout. With Hopscotch, creating and managing callouts is easy.
- Browser compatibility: Hopscotch is compatible with popular browsers.
- Customizable: Use the multiple configuration options to customize your tour!
We've barely scratched the surface of the features included in Hopscotch. The code is open source and free for anyone to use. Try a sample tour on the demo page, and check out the APIs and documentation on the Github project page.